Thursday, June 10, 2010

Lego Pops

We recently celebrated my sons birthday with a Lego and Star Wars theme, since those seem to be his current obsessions. Because June is a crazy month for us, we kept his theme very simple this year: cake and a treat.  

The cake was an easy idea: a giant Lego.


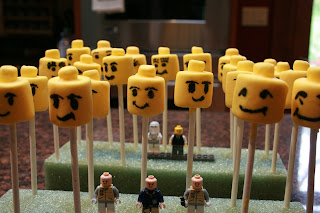
The treat:  a Lego pop with Star Wars in mind.

If you are looking for fabulous cake pops, check out Bakerella's site.  I've made brownie pops for Christmas and they turned out delicious, but I didn't have the time or energy for something as detailed as brownie or cake pops.  I went for a variation: marshmallow pops.

Look at these adoreable pops!

Here's what you'll need:
  • 15- 20 Regular size marshmallows
  • 15 - 20 mini marshmallows
  • 15-20 pop sticks (I found mine at Michael's)
  • Yellow candy coating melts
  • black edible writing pen 
  • 1-2 foam floral blocks
Getting started:
  • Melt candy coating per package directions. About 3 minutes on half power, stirring every 30 seconds.

  • Place 1 stick in the middle of a large marshmallow.
  • Stand pop in the foam block.
  • Moisten bottom of mini marshmallow with water and place it on top of large one.

  • Be sure to allow it to dry. You don't want water mixing with the candy melts.


  • Carefully dip pop into melted candy and roll to coat pop.
  • Gently tap pop against side of candy coating bowl to allow excess coating to drip off.


  •  Return pop to foam to dry.
  • When completely hardened and dry, draw faces with edible marker. (Note:  I purchased the Wilton edible markers and they were horrible. I do not recommend them. I returned my to the store.  I found some on Amazon I'm ordering for my next decoration.)
And because the Wilton markers were so lousy, it was 10:30 pm at night and my only option for an "edible" replacement was black food coloring. Brilliant, I thought.  My hubby and I painted on cute faces with a paint brush and gel food coloring.  Which did indeed look fabulous....until the kids ate them the next day...and the food coloring smeared all over their mouths and teeth.  All over.  Here's a mild example.

So here's hoping you learn from my lesson and have fun making some for your family. 
Happy Baking, Laurie

Saturday, June 5, 2010

Roasted Leg of Lamb


This is one of my favorite dishes. Ever. 

I had my first meal of lamb when I was in Australia and I was immediately hooked. I love the rich, tender taste of the lamb mixed with the aioli mint sauce. I'd fix this once a week if my husband liked lamb as much as I do. He loves this roasted lamb, he's just not a fan of lamb in general, so I only get make it about 4 times a year. But whenever I do, all of my guests rave and clean their plates. 

This recipe came from my friend and co-blogger, Candy D.  And honestly, I've made it so often, I don't remember what was original from her and what I adapted. I only know that it is fabulous! And if you've always wanted to roast lamb, and never tried it, this is a great recipe to start with.  

I also make my own mint jelly, because I want real flakes of mint leaves, not green-food-colored apple juice blended with mint flavor (which is what most store brands consist of). 

I blend the homemade mint jelly with the aioli for a spectacular side-sauce.

Roast Lamb
  • 5 lb leg or roast of lamb
  • 10 - 12 cloves garlic, peeled but not minced
  • 2-4 sprigs rosemary, fresh, not dried
  • 1 tsp sea salt, or to taste
  • fresh pepper, to taste
  • olive oil
***Mint Aioli***
  • ½ cup mayonnaise, organic
  • 2 tablespoons mint, freshly chopped
  • 1 tablespoon garlic, minced
  • 1 ½ tsp white wine vinegar
  • sea salt, to taste
To make Aioli:

  • Mix together all ingredients. Cover and chill.
  • Note:  This can be made a day ahead.
To prep the lamb:
  • Rinse lamb, pat dry (water & oil do not mix)
  • Cut deep slits in meat, and fill each slit with a garlic clove.
  • Pour a little oil on your hands and rub onto lamb.
  • Mix together rosemary, sea salt and pepper in a small bowl.
  • Massage mixture onto oiled lamb.

For best results, allow to marinade overnight in the fridge.

When ready to cook:
  • Preheat oven to 425. I roast mine on convection roast; there is no need to adjust the temp.
  • Place into 425 oven for 10 minutes. Keep in mind I am cooking at high altitude, so you may need to adjust your time.
  • Reduce oven temperature to 325, and cook for about 35 minutes. Check often until a thermometer reaches at least 145.  I like my lamb just pink in the middle.
  • When desired temp is reached, remove lamb from oven, cover with foil and let it rest at least 5 minutes. The resting is critical to allow flavors to meld and attain moist, flavorful lamb.
I hope you enjoy this as much as I do. ~ Laurie
  •