Sunday, July 25, 2010

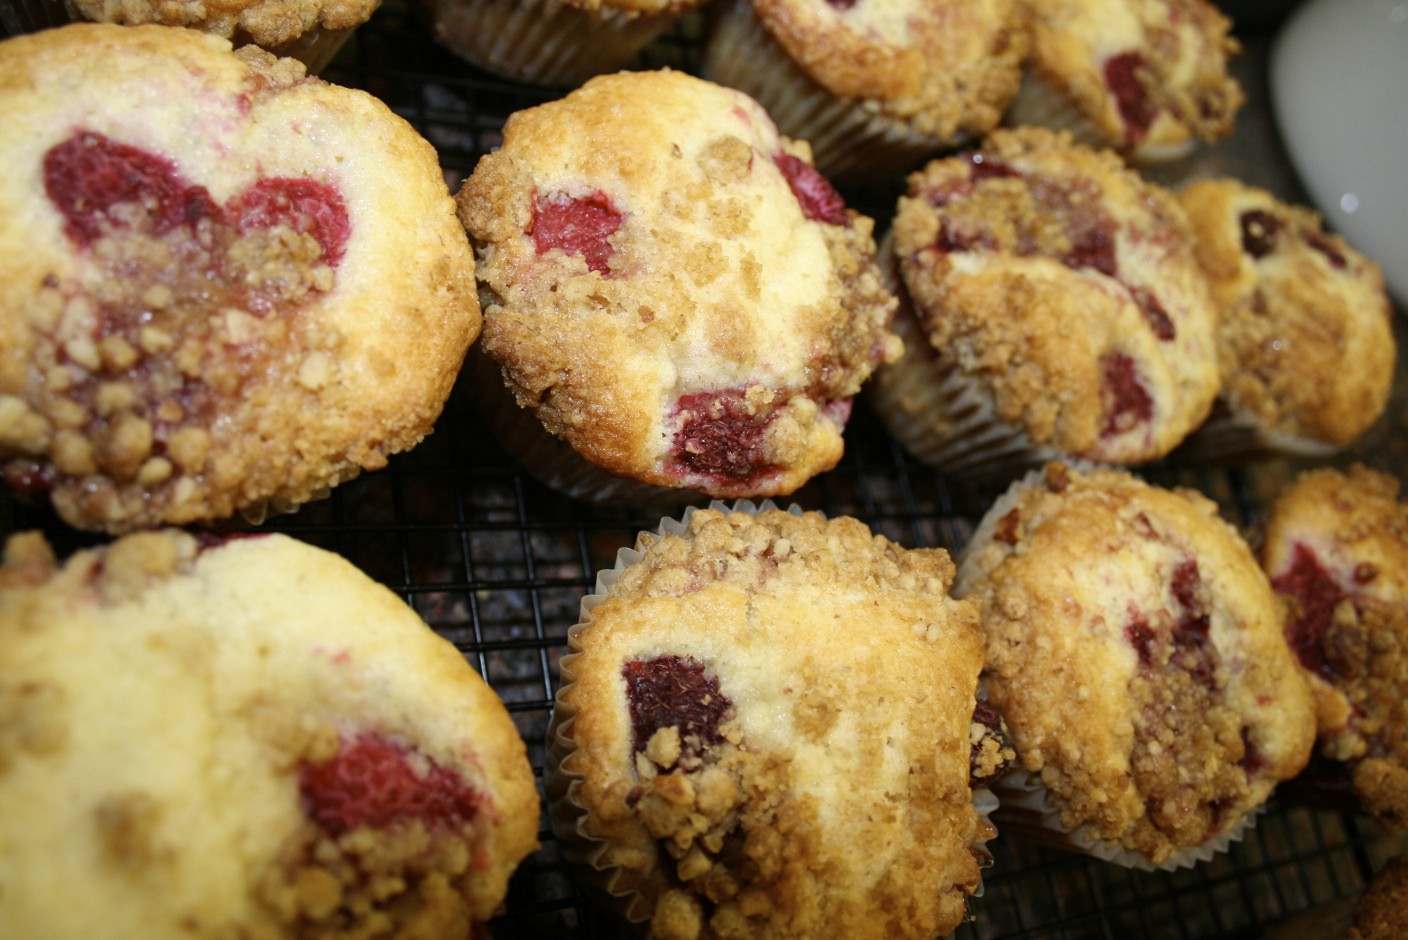
Raspberry Streusel Muffins


Its mid-July, raspberry season in my region of the Pacific Northwest, and this year I am terribly sad because the fabulous organic raspberries which I lovingly grew and tended the past five & a half years are now miles and miles away awaiting a new owner, and I am in a rental house longing for the joy of fresh picked raspberries every morning.  I comfort myself knowing that a few girlfriends are enjoying them with their family. Oh how I miss those berries and all the wonderful treats I've made with them....here's a sample of some of the creations my family and friends have enjoyed:

Raspberry Tea Cakes...
Raspberry Delight

Raspberry Cobbler
 Raspberry Tarte
 Raspberry Syrup

Raspberry Cheesecake
Raspberry Jam

Sigh...now for the reason I started this post... a moist muffin combining the tartness of raspberries with a delicious nutty streusel topping. 

This is a another recipe once made, then placed in my piles of cookbooks and recipe clippings never filed or categorized...thus lost in a wonderland of recipes hoping to be rediscovered. How many of you can relate?  (Ummm, this is where you post a comment on the blog and dialog with me.)

Here's what you need to begin:
  • 1 ½ cups flour
  • ½ cup sugar
  • 2 teaspoons baking powder
  • ½ cup rice milk
  • ½ cup butter, melted
  • 1 egg, beaten
  • 1 cup whole raspberries, divided
***Streusel Topping***
  • ¼ cup pecan, chopped
  • ¼ cup brown sugar
  • ¼ cup flour
  • 2 tablespoons butter, melted
So let's get started:
  • In a large bowl, combine flour, sugar and baking powder.
  • In a small bowl, blend rice milk, butter and egg.
  • By hand stir rice milk mixture into flour mixture just until moistened.
  • Scoop one small PC scoop of batter (about 1 Tablespoon) into each of 12 muffin cups.
  • Divide half of the berries into the 12 cups on top of batter, about 2-4 raspberries per cup. Top raspberries with the remaining batter, about another PC scoop or so.
  • Top the batter with the remaining raspberries, 2-4 raspberries each cup.

  • For the topping, combine streusel ingredients until mixture resembles moist crumbs. Sprinkle on 1 Tablespoon per muffin.
  • Bake at 350 convection for 20 minutes (high altitude, so adjust to 375 standard, and about 25 minutes).
  • Let stand in muffin pan 5 minutes.
  • Cool on rack.


Here's hoping you'll find a berry patch nearby where you can pick your own and delight your family as well.

Happy Summer,  Laurie

Monday, July 5, 2010

Summer Sangria

It's been a while since I've posted because our family moved the middle of June. So in the midst of boxes to pack and unpack, and sunshine finally arriving and my kids wanting to be outside, cooking hasn't been a priority for me.  I've been relying on tried and true, easy grilling recipes, salads, and lots of fruits.  I love the Farmers Market and can hardly wait for each Wednesday to arrive.

This is summer fruit:
But kick it up a notch and you'll have a really quick crowd pleaser for summer fun hanging with your friends: homemade Sangria.  This recipe is so easy you can make it in less than 20 minutes, start to finish, but it's best made the day before so the flavors really mellow together.

Here's what you need:
  • 4 cups water (see, how easy is that!)
  • 2 tea bags
  • 4 to 5 tablespoons raw sugar
  • 1 peach, peeled, pitted and sliced thin

  • 4 large strawberries, hulled and sliced thin
  • 1 orange, peeled and all white pith removed, cut into slices
  • 1 cup of dry red wine (or white if that's your thing)
  • ice cubes

Mix it up:
  • Bring water to boil in medium saucepan. Remove from heat.
  • Add tea bags and steep while prepping the fruit. (Steep at least 3 minutes).

  • Stir sugar into warm tea and stir to dissolve.
  • Slice fruit and place into a pitcher. 

  • Pour wine over fruit.
  • Remove tea bags, and pour tea over fruit and wine.
  • If serving immediately, fill glasses with ice and pour Sangria over ice.
  • Otherwise, chill overnight.
Serves 4 -8 depending on the size of your beverage glass.

Thursday, June 10, 2010

Lego Pops

We recently celebrated my sons birthday with a Lego and Star Wars theme, since those seem to be his current obsessions. Because June is a crazy month for us, we kept his theme very simple this year: cake and a treat.  

The cake was an easy idea: a giant Lego.


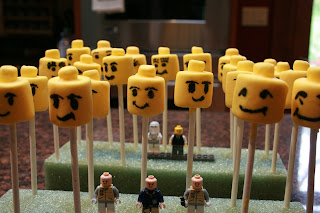
The treat:  a Lego pop with Star Wars in mind.

If you are looking for fabulous cake pops, check out Bakerella's site.  I've made brownie pops for Christmas and they turned out delicious, but I didn't have the time or energy for something as detailed as brownie or cake pops.  I went for a variation: marshmallow pops.

Look at these adoreable pops!

Here's what you'll need:
  • 15- 20 Regular size marshmallows
  • 15 - 20 mini marshmallows
  • 15-20 pop sticks (I found mine at Michael's)
  • Yellow candy coating melts
  • black edible writing pen 
  • 1-2 foam floral blocks
Getting started:
  • Melt candy coating per package directions. About 3 minutes on half power, stirring every 30 seconds.

  • Place 1 stick in the middle of a large marshmallow.
  • Stand pop in the foam block.
  • Moisten bottom of mini marshmallow with water and place it on top of large one.

  • Be sure to allow it to dry. You don't want water mixing with the candy melts.


  • Carefully dip pop into melted candy and roll to coat pop.
  • Gently tap pop against side of candy coating bowl to allow excess coating to drip off.


  •  Return pop to foam to dry.
  • When completely hardened and dry, draw faces with edible marker. (Note:  I purchased the Wilton edible markers and they were horrible. I do not recommend them. I returned my to the store.  I found some on Amazon I'm ordering for my next decoration.)
And because the Wilton markers were so lousy, it was 10:30 pm at night and my only option for an "edible" replacement was black food coloring. Brilliant, I thought.  My hubby and I painted on cute faces with a paint brush and gel food coloring.  Which did indeed look fabulous....until the kids ate them the next day...and the food coloring smeared all over their mouths and teeth.  All over.  Here's a mild example.

So here's hoping you learn from my lesson and have fun making some for your family. 
Happy Baking, Laurie

Saturday, June 5, 2010

Roasted Leg of Lamb


This is one of my favorite dishes. Ever. 

I had my first meal of lamb when I was in Australia and I was immediately hooked. I love the rich, tender taste of the lamb mixed with the aioli mint sauce. I'd fix this once a week if my husband liked lamb as much as I do. He loves this roasted lamb, he's just not a fan of lamb in general, so I only get make it about 4 times a year. But whenever I do, all of my guests rave and clean their plates. 

This recipe came from my friend and co-blogger, Candy D.  And honestly, I've made it so often, I don't remember what was original from her and what I adapted. I only know that it is fabulous! And if you've always wanted to roast lamb, and never tried it, this is a great recipe to start with.  

I also make my own mint jelly, because I want real flakes of mint leaves, not green-food-colored apple juice blended with mint flavor (which is what most store brands consist of). 

I blend the homemade mint jelly with the aioli for a spectacular side-sauce.

Roast Lamb
  • 5 lb leg or roast of lamb
  • 10 - 12 cloves garlic, peeled but not minced
  • 2-4 sprigs rosemary, fresh, not dried
  • 1 tsp sea salt, or to taste
  • fresh pepper, to taste
  • olive oil
***Mint Aioli***
  • ½ cup mayonnaise, organic
  • 2 tablespoons mint, freshly chopped
  • 1 tablespoon garlic, minced
  • 1 ½ tsp white wine vinegar
  • sea salt, to taste
To make Aioli:

  • Mix together all ingredients. Cover and chill.
  • Note:  This can be made a day ahead.
To prep the lamb:
  • Rinse lamb, pat dry (water & oil do not mix)
  • Cut deep slits in meat, and fill each slit with a garlic clove.
  • Pour a little oil on your hands and rub onto lamb.
  • Mix together rosemary, sea salt and pepper in a small bowl.
  • Massage mixture onto oiled lamb.

For best results, allow to marinade overnight in the fridge.

When ready to cook:
  • Preheat oven to 425. I roast mine on convection roast; there is no need to adjust the temp.
  • Place into 425 oven for 10 minutes. Keep in mind I am cooking at high altitude, so you may need to adjust your time.
  • Reduce oven temperature to 325, and cook for about 35 minutes. Check often until a thermometer reaches at least 145.  I like my lamb just pink in the middle.
  • When desired temp is reached, remove lamb from oven, cover with foil and let it rest at least 5 minutes. The resting is critical to allow flavors to meld and attain moist, flavorful lamb.
I hope you enjoy this as much as I do. ~ Laurie
  •  

Friday, May 28, 2010

Chocolate Zucchini Muffins


Searching for a sweet treat to take along to a Memorial Day celebration? Try these moist cupcakes and you'll be sure to please your guests. If your family doesn't eat them all first.  You'll be hard-pressed to convince others that a recipe so fabulous could actually contain zucchini. Maybe you don't need to bother sharing that secret.

This is one of my favorite recipes which I most recently made for a baby shower, and happily pleased the girlfriends who showed up.

Here's what you need:
This will make 12 regular cupcakes and 24 mini-cupcakes
  • 2 cups zucchini, shredded
  • 3 eggs
  • 1 ½ cups honey
  • ½ cup canola oil
  • 2 tsp vanilla
  • 2 cups flour
  • ⅔ cup cocoa, dark, unsweetened
  • 1 tsp baking soda
  • 1 tsp salt
  • ½ tsp baking powder
  • ¾ cup dark chocolate pieces, chopped
***Frosting***
  • 1 cup peanut butter
  • 2/3 cup butter, softened
  • 2 tablespoon rice milk
  • 1 tsp vanilla
  • 3 to 3 1/2 cups powdered sugar
On to the mixing and baking:
  • Preheat oven to 325 standard or 300 convection.
  • In a large bowl stir together zucchini, eggs, honey, oil and vanilla. Blend well.
  • In a separate bowl, stir flour, cocoa, baking soda, salt, baking powder and chocolate pieces.
  • Add flour mixture to wet mixture.
  • Fill lined cupcake molds no more than half full.
  • Bake in convection oven for 20 minutes for regular size cupcakes or 11 minutes for mini cupcakes.
  • Cool completely, then frost.
Whip up the Frosting:
  • Beat peanut butter, butter, rice milk and vanilla until smooth.
  • Stir in powdered sugar and mix until combined.

Saturday, May 22, 2010

Glazed Grilled Salmon


Here's another delicious, easy grilled Salmon recipe for you to add to your menu next week. Like the one Heather posted last week, this recipe is simple and includes just 5 ingredients. Plus, it only needs to marinade for 5 minutes; about the same amount of time it takes to prep your grill and get it super hot. 

Toss together a salad, and a side of rice, and you've got dinner together faster than Rachel Ray.   Now go fire up the grill and get ready for supper.


Here's what you'll need from the pantry:
  • 2 tablespoons splenda
  • 1 ½ tsp rice vinegar
  • 1 ½ tsp dry mustard
  • 1 tablespoon soy sauce
  • ½ tsp molasses dark
  • 12 ounces salmon filet, cut in 2-3 pieces
This is so easy:
  • Mix together all 5 ingredients. 
  • Set aside 1 Tablespoon of marinade in a small dish.
  • Place salmon on a plate and pour seasoning over it, covering both sides.
  • Let salmon sit, skinless side down for 2 or 3 minutes.

  • Grill 5 minutes over indirect heat.  Turn salmon and baste with marinade left on the plate. Grill 5 minutes more.
Drizzle with the reserved seasoning before serving.

Wednesday, May 19, 2010

Orange - Glazed Salmon


Orange - Glazed Salmon
For as minimal as the ingredients are in this recipe, it is flavor filled! It manages to pack sweet, spicy, and zesty all into one amazing dish! It only takes roughly 6 minutes cook up! Throw in a salad and you will have a meal to remember!


Ingredients:2 Tbsp Cajun Spice
1/2 Tsp brown sugar
Pinch of kosher salt
2 boneless, fresh salmon fillets (6 oz. each)
1 Tbsp olive oil
2 Tbsp orange marmalade
1 1/2 Tsp lime juice
Lime wedges

Combine: Cajun spice, brown sugar, and salt in a small bowl. Rub mixture over all surfaces of fillets. Saute fillets in oil in large nonstick skillet over medium-heat for 3-4 minutes. Turn fish and saute an additional 2-3 minutes.

Blend: Marmalade and lime juice; swirl in pan until marmalade is melted. Carefully turn fish to glaze on all sides. Fish is done when it begins to flake when tested with a fork

Serve: Slice up lime wedges and serve with fillets

I really loved how the ingredients brought out the best in the salmon and didn't cover up the naturally wonderful flavor of the fish itself! Enjoy!

Friday, May 14, 2010

Everybody Cooks Rice

We checked out the best children's book from our local library called Everybody Cooks Rice.   Its a story about a mom who is making rice for dinner.   She tells her daughter to go look for her brother and tell him its time for dinner.   The daughter goes around the neighborhood into each of her neighbor's home looking for her brother.   Every neighbor is making rice for dinner, but every neighbor is from a different country so each rice dish is different.   The best part of the book is that in the back of the book is a recipe for each rice dish.

We took a couple of weeks making each recipe except for the one which we couldn't find any pigeon peas.   My kids were good sports and at least tried each recipe.    I had fun making all of the recipes.   I'm not sure what my favorite was, but when I asked the kids they said their favorite was Mrs. Tran's Fried Rice, so its the recipe I'm listing below.    They almost said Mrs. Hua's Tofu with Vegetables, not because they liked the dish (because they didn't) but because they got to eat it with chopsticks.   I enjoyed the Biryani and would like to make it again with a little tweaking.   If you aren't into experimenting with rice, they also have Everybody Bakes Bread, Serves Soup, and Brings Noodles.

Mrs. Tran's Fried Rice

2 eggs
1 T Butter
1 small onion, peeled and finely chopped
3 T oil
1/2 c green peas
1/2 c corn
1 carrot, peeled and grated
1 t sugar
1 T fish sauce
2 T soy sauce
4 cups cold cooked rice

1)  Scramble the eggs in butter and set aside.

2)   In a wok or large frying pan over medium heat, saute onion in oil until it's transparent

3)  Add the vegetables and cook, stirring, for three minutes

4)  Add sugar, fish sauce, and soy sauce, and mix well.

5)  Add rice and cook for about five minutes, stirring frequently, until all the food it hot.

6)  Chop up the scrambled eggs, mix them in, and serve.

Tuesday, May 11, 2010

Avocado Salsa Dip

I got this recipe from my sister and have made it many times.    It didn't come with a name so we  named it ourselves and called it Tomatoless Salsa Dip.   My sister doesn't like tomatoes (how weird is that), but they are one of my favorites and I had a box of cherry tomatoes in my fridge I was looking to use up, so I added it to this recipe tonight.   But then that ruined the whole Tomatoless thing, so I've renamed again as Avocado Salsa Dip.   If you aren't a tomato lover either, please feel free to leave them out and join the weird Don't Like Tomatoes Club.


I made Taco Salad for dinner tonight and we dumped the Avocado Salsa Dip on top of the salad and it made for a really nice addition to the salad.   ~Denise

Avocado Salsa Dip

Combine these ingredients:
1 can sliced olives
1/2 cup frozen corn
1 cup cherry tomatoes cut in half
1/2 onion, chopped fine
1/2 red pepper, chopped fine
1/2 teaspoon garlic

Combine these ingredients for marinate:

4 Tb olive oil
2 Tb lemon juice
2 Tb balsamic vinegar
salt & pepper to taste

Add marinate to salsa dip.   Let set in fridge for at least 1 hour.

Add one chopped avocado before serving.   Don't forget this.   Avocado is what makes this dip and can't tell you the countless times I have forgotten! 

Recipe easily doubles.  Feel free to add more or less of each ingredient depending upon your own personal likes/dislikes.   Use as a dip with chips or top your favorite taco! 

Monday, May 10, 2010

Very Berry Cheesecake


VERY BERRY CHEESECAKE

This is a terrific recipe and it received rave reviews from my entire family, over Mother's Day weekend. I'm positive I will be making this one again and again!

I followed the recipe to the letter (something very much out of the norm for me) and I suggest you do the same to get the same fabulous results! Enjoy! - Heather

Ingredients:
For crust -
butter, 3/4 cup
graham crackers, 8 ounces

For topping -
lemons, 2 - rind and juice
gelatin, 1/2-ounce envelope
cottage cheese, 1 cup
cream cheese, 1 cup
canned condensed milk, 14 ounces
strawberries, 4 cups, hulled
raspberries, 1 cup

Note: You'll need a 8-inch round, loose-bottomed, nonstick, spring-clip pan & some parchment paper, a blender or food processor, and a strainer. This also requires overnight to set up, so plan ahead if you want to make this sweet treat!

Step 1: With a pencil, draw around the bottom of an 8-inch round, loose-bottomed, nonstick spring-clip cake pan onto parchment paper. Cut out the circle and use to line the bottom of the cake pan.
Step 2: To make the base of the cake, put the butter in a pan and melt over low heat. Break the graham crackers in pieces, put them in a blender or food processor, and blend until they are crumbs. Stir into the melted butter and mix well.
Step 3: Tip the buttery crumbs into the cake pan and use a spoon to spread the mixture in a thin, even layer over the bottom, pressing down well with the back of the spoon. Put the pan in the refrigerator while you make the topping.
Step 4: To make the topping, put the lemon rind (I simply used my lemon zester here) and juice in a small bowl and sprinkle over the gelatin. Stand the bowl in a pan of water and heat gently, until the gelatin has all melted. Stir, remove bowl from pan, and let cool.
Step 5: Drain cottage cheese in a strainer, then transfer to a blender or food processor and blend for 20 seconds. Add the cream cheese and condensed milk, cover with the lid again, and blend the mixture again until smooth.
Step 6: Pour in the dissolved gelatin mixture and blend once more.
Step 7: On a cutting board roughly chop half the strawberries with sharp knife and scatter ove the cakes cookie base with half the raspberries, reserving the rest for decoration.
Step 8: Pour the cheese mixture over the fruit. Level the top with the back of a spoon. Cover and chill in the refrigerator overnight, until set.
Step 9: Loosen the edges of the cheesecake with a palette knife (go around the entire edge of the pan...VERY IMPORTANT or cake will crack!). Open the side clips of the pan and slide off of cake. Put the cheesecake on a serving plate and decorate with reserved fruit!

This is a crowd pleaser for sure, so be sure to give it a try!

Monday, May 3, 2010

Davy Crockett bars revisited

I'm blogging in response to a post that Denise made in February with a recipe for these incredible Davy Crockett bars

If you haven't made them yet, now is a great time to try them. I improvised her recipe a bit by cleaning out my pantry of those almost-empty-not-quite-sure-why-I'm-saving-them items, and dumped them into an already great recipe.  Then I took the resulting ingredient list to my sons preschool class and spent a morning baking with them. I pre-measured the items so everyone had a chance to add and stir. So fun and so easy! Happy kids. Happy teachers. Happy me!
Unfortunately, I also took my pocket-sized Olympus camera with me and I'm NEVER happy with the photos it takes, but I also don't mind if the kids take photos with it (ie: it's cheap).


Now it's your turn...happy Monday!   ~Laurie

Monday, April 12, 2010

Kahlua Chocolate Cake


Oh do I have a fabulous treat for you today!  You will want to make this one right now - - as soon as you gather the simple ingredients. This is a moist rich chocolate cake, and you'll most likely want more than one slice. Ummm! Ummmm! I can still savor the last bite melting on my tongue.

This recipe was passed on to me by my friend, Candy D., who has other recipes posted here.  I made mine healthier by using organic cake mix with no dairy or preservatives in the mix (have ya looked at the ingredients on a Betty Crocker cake mix!). You can also use a gluten free cake mix.  I used an organic pudding mix, containing no dairy and no gluten, along with using cage free, hormone free eggs. Of course I used real butter; there is NO substitute for real butter in a recipe.

So let's get started. Here's what you need to pull from your pantry:
  • 1 yellow cake mix (I highly recommend Dr Oetkers organic for DF and GF - - and unfortunately, they are NOT paying me to say that)
  • 1 small chocolate pudding, instant, (again, Dr Oetkers organic for DF or GF)
  • 4 eggs
  • 1 cup vegetable oil
  • ¼ cup vodka
  • ¼ cup kahlua
*** ICING ***
  • 1 cup sugar
  • ½ cup butter (1 stick)
  • ¼ cup water
  • 2 tablespoons vodka
  • 2 tablespoons kahlua
This is so easy:
  • Combine all ingredients into large mixing bowl.
These are the organic mixes I prefer: Dairy Free, and also comes Gluten Free, but I did not use GF.

I find the difference between a free-range, hormone-free brown egg, and your standard mass produced white egg to be quite extreme.  The best one's I get are from my parents; unfortunately I only see them once a month or so.
  • Beat on low to medium for 10 minutes
  • Pour into DeMarle Bundt pan or greased bundt pan. If you've never used DeMarle, you should try it soon. No greasing, no flour, and always a clean peel!
  • Bake at 325 convection for 50 minutes (high altitude) or 350 standard oven for 55-60 minutes.
For icing:
  • Combine sugar, butter and water in a medium saucepan on the stove.
  • Bring to a boil. Watch and stir carefully as you do not want sugar to brown.
  • Cool sugar mixture.
  • Cool cake for 10 minutes, out of the oven, but still in the bundt pan.
  • Add the 2 T of each, vodka and kahlua to sugar mixture. Whisk until well blended.

If you find this Russky Standard Vodka sold in the US - - buy it! It is rarely imported, pure, and the favored original among Russian nationals (so we were informed by our highly respected friends in Russia). We bought home at least 2 bottles on every trip we took to Russia.
  • Slowly pour icing mixture all over baked cake while it is still in the bundt pan.
 
  • Allow cake to remain in pan about 10 minutes to soak up all the icing.
  • Gently remove cake from pan and allow to cool completely before serving.

Thursday, April 1, 2010

Easter Cookies


Here's a really fun one to do this time of the year to help your little ones get a better understanding of the true reason for Easter.  Plan ahead, because you MUST start this on the night before Easter and finish it on Easter morning.

I'm inserting photos this weekend as we make them at our house.

Here's what you need:
  • 1 cup pecans
  • 1 tsp vinegar
  • 3 egg whites
  • pinch salt
  • 1 cup sugar
  • zipper baggie
  • wooden spoon
  • masking tape
  • Bible
Here's what to do:
  • Preheat oven to 300 (must be preheated).


Part 1 

  • Place pecans in a zipper baggie and let children beat them with the wooden spoon to break into small pieces. (Oops! Warn them to keep their little fingers away from the bag or they will experience first-hand how painful it is to be beaten.)
  • Read John 19:1-3
So Pilate took Jesus and had him whipped. The soldiers, having braided a crown from thorns, set it on his head, threw a purple robe over him, and approached him with, "Hail, King of the Jews!" Then they greeted him with slaps in the face.
  •  Explain that after Jesus was arrested, He was beaten by the Roman soldiers. (Set aside the baggie of crushed nuts).
Part 2
  • Let each child smell the vinegar.   Put 1 tsp vinegar into a mixing bowl.
  • Read John 19:28-30
After this, Jesus, knowing that all was now finished, said ( to fulfill the Scripture), "I thirst." 29A jar full of sour wine stood there, so they put a sponge full of the sour wine on a hyssop branch and held it to his mouth. 30When Jesus had received the sour wine, he said, "It is finished," and he bowed his head and gave up his spirit.
  • Explain that when Jesus was thirsty on the cross, He was given vinegar to drink.
Part 3 

  • Add egg whites to vinegar.
  • Tell your children that eggs represent life.  
  • Read John 10:10-11 
 10 The thief does not come except to steal, and to kill, and to destroy. I have come that they may have life, and that they may have it more abundantly.
11 “I am the good shepherd. The good shepherd gives His life for the sheep.

  • Explain that Jesus gave His life to give us life. 
Part 4
  • Sprinkle a little salt into each child's hands. Let them taste it and brush the rest into the bowl. 
  • Explain that this represents the salty tears shed by Jesus' followers, and the bitterness of our own sin.
  • Read Luke 23:27
27A large number of people followed him, including women who mourned and wailed for him.

Part 5
  • Ask your kids, so far the ingredients are not very appetizing.
  • Add 1 c sugar. Explain that the sweetest part of the story is that Jesus died because He loves us. He wants us to know and belong to Him.
  • Read Psalms 34:8 and John 3:16.


8Discover for yourself that the LORD is kind.  Come to him for protection, and you will be glad. 
 16"For God so loved the world that he gave his one and only Son, that whoever believes in him shall not perish but have eternal life.


  • Beat the mixture with a mixer on high speed for 6 to 15 minutes (depending on your method of mixing) until soft peaks are formed.
  • Explain that the color white represents the purity in God's eyes of those whose sins have been cleansed by Jesus.
Part 6
  • Read Isaiah 1:18 and John 3:1-3.


"Come. Sit down. Let's argue this out." This is God's Message: "If your sins are blood-red, they'll be snow-white.  If they're red like crimson, they'll be like wool."
1There was a man named Nicodemus who was a Pharisee and a Jewish leader. 2One night he went to Jesus and said, "Sir, we know that God has sent you to teach us. You could not work these miracles, unless God were with you."
    3Jesus replied, "I tell you for certain that you must be born from above before you can see God's kingdom!"
  • Gently fold in the broken nuts with a spatula.
Part 7
  • Drop by teaspoons onto silpat or wax paper covered cookie sheet. 

  • Explain that each mound represents the rocky tomb where Jesus was laid.
  • Read Matthew 27:57-60.


57That evening a rich disciple named Joseph from the town of Arimathea 58went and asked for Jesus' body. Pilate gave orders for it to be given to Joseph, 59who took the body and wrapped it in a clean linen cloth. 60Then Joseph put the body in his own tomb that had been cut into solid rock and had never been used. He rolled a big stone against the entrance to the tomb and went away. 


Part 8
  • Put the cookie sheet in the oven, close the door and turn off the oven.

 (Very Important!)
  • Give each child a piece of tape and seal the oven door. (My kids LOVED this part!). Explain that Jesus' tomb was sealed.  


  • Read Matthew 27:65-66.


 65"Take a guard," Pilate answered. "Go, make the tomb as secure as you know how." 66So they went and made the tomb secure by putting a seal on the stone and posting the guard.

Part 9
  • Tell them it's time to go to bed!! Explain that they feel sad to leave the cookies in the oven overnight, just like Jesus' followers were in despair when the tomb was sealed. 
  • Read John 16:20 and 22.
20I tell you for certain that you will cry and be sad, but the world will be happy. You will be sad, but later you will be happy.     22You are now very sad. But later I will see you, and you will be so happy that no one will be able to change the way you feel.

Part 10
  • 

On Easter morning, open the oven and give everyone a cookie. 
  • Notice the cracked surface and take a bite.  
  • The cookies are hollow!  
  • On the first Easter, Jesus' followers were amazed to find the tomb open and empty.
  •  Read Matt. 28:1-9
1-4 After the Sabbath, as the first light of the new week dawned, Mary Magdalene and the other Mary came to keep vigil at the tomb. Suddenly the earth reeled and rocked under their feet as God's angel came down from heaven, came right up to where they were standing. He rolled back the stone and then sat on it. Shafts of lightning blazed from him. His garments shimmered snow-white. The guards at the tomb were scared to death. They were so frightened, they couldn't move.  5-6The angel spoke to the women: "There is nothing to fear here. I know you're looking for Jesus, the One they nailed to the cross. He is not here. He was raised, just as he said. Come and look at the place where he was placed.
 7"Now, get on your way quickly and tell his disciples, 'He is risen from the dead. He is going on ahead of you to Galilee. You will see him there.' That's the message."
 8-10The women, deep in wonder and full of joy, lost no time in leaving the tomb. They ran to tell the disciples. Then Jesus met them, stopping them in their tracks. "Good morning!" he said. They fell to their knees, embraced his feet, and worshiped him. Jesus said, "You're holding on to me for dear life! Don't be frightened like that. Go tell my brothers that they are to go to Galilee, and that I'll meet them there."


I hope this becomes a sweet tradition in your family as you celebrate the Risen King of Kings!  
Happy Easter!  Laurie